To all installation companies
Common
When installing gas appliances, the Law Concerning the Supervision of the Installation of Specified Gas Consumption Equipment, the Gas Business Law, the Law Concerning the Maintenance of Safety and Proper Trade of LPG, the Building Standards Law, and the Fire Service Law are relevant and require the installation of appropriate air supply and exhaust systems and fire prevention considerations.
Below is a summary of the installation standards for gas appliances. Gas connection and water connection work is required for the installation of gas appliances. Please also read the "Installation Manual" that comes with the appliance as well as the "Installation Standards and Practical Guidelines for Gas Appliances" published by the Japan Gas Appliance Inspection Association.
Use the gas type and power source indicated on the nameplate attached to the gas appliance.
Do not install the gas appliance with a different gas type or power source, otherwise a fire may occur or the appliance may be damaged.
Construction Work Requiring Qualifications
- Installation
- Installation of appliances that require an exhaust stack requires construction under the direction of a supervisor or supervisors and labeling in accordance with the Law Concerning the Supervision of Installation of Specified Gas Consumption Appliances.
- Gas piping
- For gas piping connection work, follow the instructions of the gas supplier. For gas pipe connection work with screw connections, work must be performed by a qualified person. In the case of city gas, work to connect gas appliances using metal pipes, metal flexible pipes, reinforced gas hoses, or equipment connection gas taps must be performed by a person whose skills are recognized by the gas supplier. Or, a GSS (Gas Appliance Installation Specialist), a supervisor of gas flexible pipe connection work, a simplified internal pipe installer, or an internal pipe installer is required. In the case of LP gas, a Liquefied Petroleum Gas Installation Specialist certification is required for work to connect gas appliances using metal pipes, metal flexible hoses, or equipment connection gas taps.
- Water supply and hot water piping The work should be performed by the water utility's designated contractor in accordance with local water supply ordinances.
- Electrical Wiring
- Electrical wiring should be performed by a contractor designated by the power company.
The following symbols indicate the contents to be observed.
お守りいただく内容は次の絵表示がしてあります。
| This pictorial display is a "prohibited" content that must not be done. | |
| This pictorial display is the content of "forced" that must be executed. | |
| Ignoring this display, it indicates the contents that may cause death, serious injury, or fire if the worker makes a mistake in the work or due to a defect after the work. | |
| Ignoring this display, it indicates that if the work is mistaken, the worker may be injured or the user may be injured due to a defect after the work, or only property damage may occur. |
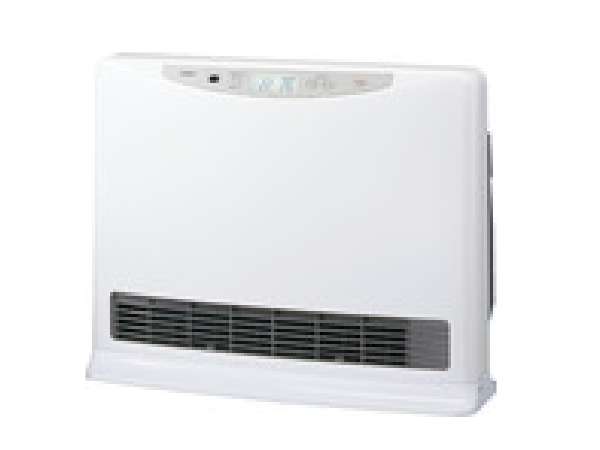
Water heater edition
Fresh air is always required to completely burn the gas.
Recent housing structures are becoming more and more sealed to improve the air-conditioning effect. br> Therefore, if the water heater (water heater) that consumes a lot of gas is used for a long time in a closed room, the room will be short of oxygen, causing incomplete combustion and causing a dangerous poisoning accident. It will be. To prevent this, a water heater (water heater), etc. must be installed in an appropriate location, and appropriate air supply / exhaust equipment (ventilation fan, ventilation port, exhaust port, exhaust stack, etc.) must be installed.
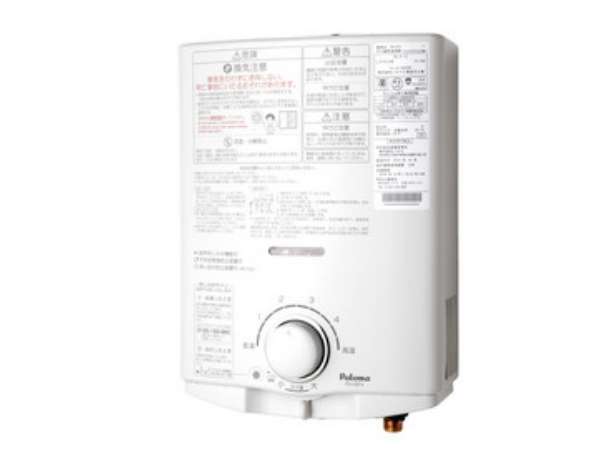
No. 5 water heater
- According to the Fire Prevention Ordinance, the circumference of the water heater should be 4.5 cm or more on the side from the combustibles, and the water heater with a built-in heat shield hood should be 15 cm or more away from the combustibles (15 cm or more from the hood for the hood-mounted type). If a heat shield is attached above, keep it at least 10 cm away.
- Install in a place where sufficient ventilation (air supply, exhaust) can be obtained. Install so that the upper part of the device is below the upper end of the ventilation fan. The incomplete combustion prevention device may operate and may not catch fire. It may also cause equipment failure or shorten the service life.
* The size of the ventilation fan and the air supply port depends on the gas consumption of the equipment used at the same time in the room.
Reference table for the size of the ventilation fan - Please use this device in conjunction with the ventilation fan interlocking switch (sold separately) as much as possible.
- Even if the upper part of the device is 150 mm or more away, the upper surface and rear surface within 400 mm may be deformed or discolored due to exhaust heat if it is a painted surface, vinyl cloth, a hanging cupboard made of resin, or a thin veneer. Use gypsum board, etc. for effective protection.
-
Prohibition of use of combustion equipment under equipment
Do not install in a position where combustion exhaust gas rises (such as above the stove or microwave oven).
If it is unavoidable to install it, take effective protective measures for the water heater.
→ The incomplete combustion prevention device may operate and may not catch fire.
It also shortens the life of the equipment.
* The air supply port should have an opening area of 10 cm2 or more per 1.16 kW of gas consumption.
Natural exhaust type water heater
Install the natural exhaust type water heater outside the bathroom.
An exhaust stack is required to exhaust the combustion exhaust gas to the outside.
Keep the exhaust stack at least 1/2 the diameter of the exhaust stack away from flammable walls, ceilings, and furniture. Also, be careful not to touch flammable objects such as curtains.
The tip of the exhaust stack should be equipped with a bird net (a 16mm ball does not fit) at a position and structure that does not interfere with exhaust.
- Keep the tip of the exhaust stack at least 60 cm away from the roof surface.
The diameter of the exhaust stack should not be smaller than the diameter of the connection part of the equipment.
For the exhaust stack, use a product with a pass mark from the Japan Gas Appliances Inspection Association.- The horizontal pull should be 5m or less. In addition, please provide an inspection port when constructing the concealed part.
- Be sure to withstand its own weight, wind pressure, vibration, etc., and attach it firmly so that the connection part does not come off easily. Also, if there is any misalignment or disconnection in the connection part of the exhaust stack, repair it, and if there is a hole, replace it.
- Install so that condensed water (drain) does not collect.
Be sure to fix the buffler part of the equipment and the equipment connection part of the exhaust stack with screws so that they will not come off, and install them so that there is no exhaust leakage.
The height of the exhaust stack should be 10m or less.
- Use a stainless steel or other material with sufficient corrosion resistance for the exhaust stack.
When penetrating a flammable wall, insulate the circumference of the exhaust stack with a non-combustible heat insulating material with a thickness of 2 cm or more.
There is one air supply port (and ventilation port) at the top and bottom of the room, and open it in a place that allows outside air to pass through. The effective opening area is equal to or greater than the cross-sectional area of the exhaust stack of gas appliances. The table below shows the area required for each of the following models.
-
Exhaust pipe construction requires construction or supervision by a person who has the qualification of "Special Supervision Law". After the construction is completed, please confirm that the display label based on the Special Supervision Law is affixed to the upper part of the equipment and the equipment connection part of the exhaust stack.
* Please install the above equipment even when installing in a cooking room for business use. In addition, regarding the installation of semi-enclosed (CF, FE) water heaters under the hood, the Building Standards Act and Fire Prevention Ordinance have been revised, and when installing semi-enclosed gas water heaters with gas consumption exceeding 12 kW, A dedicated exhaust stack must be provided to exhaust the air outdoors. Therefore, the exhaust stack of the semi-enclosed gas water heater should not be connected to the exhaust duct or the exhaust should not be exhausted through the hood. (June 1995)
However, if it is extremely difficult to install an exhaust stack due to usage or structural reasons, a water heater that can directly connect the exhaust stack to the exhaust duct is also on sale. Please contact us. -
Install the natural exhaust type exhaust top outside the range of the wind pressure zone.
* If the exhaust top is open in the wind pressure zone, a backflow phenomenon will occur.
Example of installation position of exhaust top
Forced exhaust type water heater (water heater) and bath kettle
Install the forced exhaust type water heater and bath kettle outside the bathroom.
An exhaust stack is required to discharge the combustion exhaust gas to the outside.
1.Be sure to use a Paloma exclusive product (with a bird net) for the exhaust stack top and take it outdoors.
2.Keep the exhaust top at a distance of more than the standard value from the surrounding combustibles.
* ( ) Is when a heat shield is attached.
3.Install the exhaust top in a place where there is no opening (for example, a window that can be opened and closed, a ventilation tube in the bathroom, etc.) where the combustion gas flows into the room within a certain range.
4.Treat the wall penetration with non-combustible insulation with a thickness of 2 cm or more in the exhaust stack so that it does not come into contact with flammable materials.
5.Use a product made by Paloma or a product with a pass mark from the Japan Gas Appliances Inspection Association.
- Do not shrink the exhaust stack in the middle with the specified diameter.
- The extension distance of the exhaust stack should be within the specified value in the construction manual.
6.Make sure that the connection between the exhaust port and the exhaust stack of the water heater (water heater) and the bath kettle, and the connection between the exhaust stacks are prevented from coming off and that the exhaust gas does not leak.
- Install the exhaust stack with a downward slope of about 1/50 so that drain does not collect.
- Fix the exhaust stack so that it can withstand its own weight, wind pressure, vibration, etc., and install it so that maintenance and inspection can be performed easily.
7.Keep the exhaust stack at least 1/2 the diameter of the exhaust stack away from combustibles. Alternatively, cover it effectively with a heat insulating material.
8.Avoid installing the exhaust stack in the concealed area as much as possible. If it is unavoidable to install it, prevent it from coming off and leaking, and cover it with a non-combustible material (20 mm) other than metal. Provide an inspection port so that the exhaust stack can be inspected and repaired.
9.Do not connect the exhaust stack to other ventilation ducts (for example, kitchen range hood ducts), and guide it outdoors by itself.
10.Never attach a fire damper to the exhaust stack.
11.The effective opening area of the air supply port should be equal to or larger than the cross-sectional area of the exhaust stack.
12.Exhaust pipe construction requires construction or supervision by a person who has the "Special Supervision Law" qualification. After the construction is completed, please confirm that the display label based on the Special Supervision Law is affixed to the upper part of the equipment and the equipment connection part of the exhaust stack.
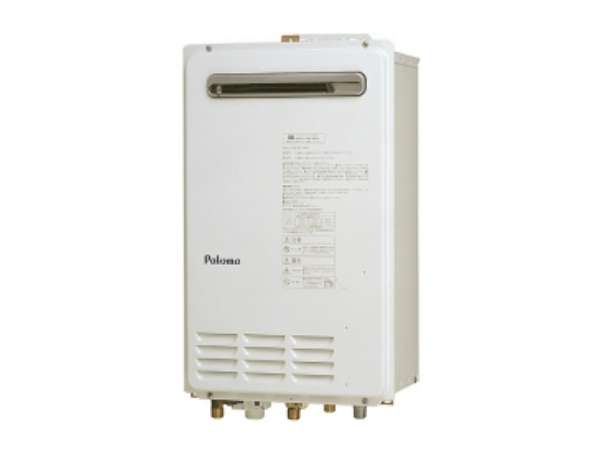
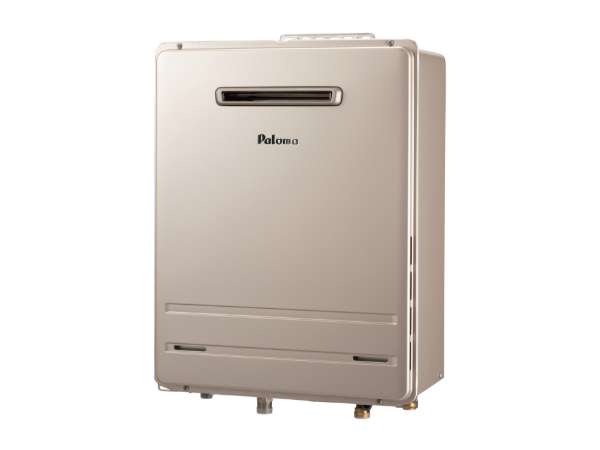
Outdoor water heater and water heater with bath
Please confirm the following about the installation location before construction.
Atmosphere around the equipment
- Do not install in places where flammable dangerous materials such as gasoline, benzine, and adhesives are handled.
- Do not install in places where commercial chemicals (ammonia, chlorine, sulfur, ethylene compounds, acids, etc.) are used.
- Do not install in a place where the wind from a ventilation fan, range hood, etc. affects the air supply and exhaust of the equipment.
- It is for outdoor use only. Never install it indoors.
- Do not install it in a place where flammable items such as laundry are placed near the exhaust part of the main body.
- Do not install near gas meters or electrical equipment.
- Do not install equipment near the evacuation exit.
- Considering the durability of the equipment, we recommend that you install it in a place where it will not be exposed to direct rain or snow, or where it will not be tampered with.
- Install it in a place that does not disturb neighboring houses due to noise.
- After installation of outdoor hot water equipment, do not surround the equipment with corrugated sheets or vinyl.
There is a risk of carbon monoxide poisoning and fire due to incomplete combustion.
Separation distance between combustibles and exhaust outlet or equipment
- Keep the upper part of the equipment at least 300 mm away from the exhaust outlet.
(The same is for non-combustible materials, which is 300 mm or more.) - Keep the front of the device at least 600 mm away from the exhaust outlet.
(In the case of non-combustible material, it will be 300 mm or more, but please secure 600 mm or more as a maintenance space.)
Of the parts that are directly exposed to exhaust heat even in front of 600 mm or more, those that are sensitive to heat (plastic etc.) and those that are easily discolored Protect (painting, etc.) with non-combustible heat insulating material. - Keep the rear of the device at least 10 mm away.
- Keep the device side at least 150 mm away. (There is also a 10 mm device.)
(In the case of non-combustible material, it will be 45 mm or more, but please secure 150 mm or more as a maintenance space.) - Keep the area below the exhaust port at least 150 mm away.
- Separation distance from the exhaust port
Upper 300mm Front 600mm Side 150mm Down 150mm - Separation distance from the main body
Upper 150mm Front 150mm Side 150mm (10mm equipment is also available) Rear 10mm
Separation distance between the opening and the exhaust port outlet
- Make sure it is installed in a location with no windows. If there is a window, make sure it is installed at least 300 mm above the surrounding building opening (if within 300 mm but at least 600 mm away from the actual length of the building). (Excluding the case of a building with a floor space of more than 150 mm) on the side and below.
What is a building opening?
Building openings here refer to windows, doors, and other openings in buildings that are movable (e.g., casement windows, sliding windows, and swinging doors); windows that cannot be opened or closed for lighting and fixed single-paned windows are not considered openings.
[Note:] Please pay particular attention to the windows of neighboring houses. Hot air may enter and cause complaints.
Repair / inspection space
- For repair and inspection of the equipment, leave a space of about 600mm in front of the equipment and about 150mm on the side.
- Please secure a space under the equipment for plumbing work and drainage operation.
[Caution] Do not install in places where repair / inspection is difficult or where work is dangerous (places where ladders or yagura are required, etc.).
Directly connected to the exhaust duct
Confirmation of installation location
- The main installation location of this equipment is the kitchen room, and since exhaust is performed by the power of the exhaust duct fan for the kitchen, be sure to connect it to the exhaust duct that draws the specified air volume. Do not install only a single exhaust stack. Exhaust gas may stay and there is a risk of carbon monoxide poisoning accidents.
- Do not install in places where flammable hazardous materials such as gasoline, benzine, adhesives, and sprays are handled. It may catch fire and cause a fire.
- According to the Fire Prevention Ordinance, the area around the equipment should be installed at a distance of 15 cm or more to the side, 15 cm or more to the front, and 4.5 cm or more to the rear from combustibles. If it is less than this, a fire may occur.
- Keep a sufficient distance from other equipment that may generate oily smoke. When installing in close proximity, take effective measures to prevent oils and fats from flowing into the air intake holes of the equipment. Failure to observe the above may result in a duct fire.
- Provide an air supply port with an effective area of 315 cm2 or more. Avoid positions where the air supply port is always open to the outside air and blocked by furniture.
- Do not install in a place where the wind from the air conditioner etc. directly hits the air supply and exhaust of the equipment.
- Please avoid installing it outdoors.
- Install the product at an ambient temperature of 35 °C or less.
If the ambient temperature rises, the safety device may operate and the equipment may stop. - Do not install in a place where corrosive gas such as ammonia, chlorine, sulfur and acids is generated.
- For equipment repair and inspection, provide a space of 600 mm or more in front of the equipment and 300 mm or more on the sides.
- Install 300 mm or more below the equipment for plumbing work and drainage operation.
Exhaust duct connection work
- Make sure that the size and exhaust capacity of the main duct that connects the equipment is designed to ensure an air volume of 830m3 / h [required static pressure 150Pa (15mmH2O)] or more per unit of this equipment.
- The main duct, branch duct, and each connection of this device should be firmly attached with heat-resistant sealing material, caulking material, etc. to maintain airtightness.
- Take effective measures to prevent oils and fats from dripping from the exhaust duct to the main body of the equipment.
- The duct connection diameter of the equipment is φ200.
- Follow the procedure below to connect the equipment to the branch duct of the exhaust duct.
- Make one hole of φ4 to φ5 at a position 10 mm from the lower end of the front of the branch duct.
- Connect the equipment to the branch duct, align it with the hole of the equipment, and fix it with the tapping screw. Be sure to secure a gap of 20 mm between the top plate of the equipment and the branch duct.
The device cannot be attached or detached without a gap of 20 mm.
For details on equipment installation work, refer to the "Installation Work Manual" that comes with the product.
Please also read "Gas Appliance Installation Standards and Practical Guidelines" {published by Japan Gas Appliance Inspection Association}.
If any of the existing equipment currently in use does not meet the installation standards, the gas equipment may not burn normally and may cause an accident, etc., so please make improvements.
About gas, water supply, hot water supply piping work
Carefully check the attached installation work manual before performing gas, water supply, and hot water supply piping work.
Do not use vinyl chloride piping because the hot water temperature and water pressure are added to the pre-stop hot water supply piping. It may explode and cause an accident. Deoxidized copper tube or stainless steel tube is recommended.
Recommendation of periodic inspections (charged)
Even if there is no problem in using the equipment, it is important to inspect the burners and other parts of the equipment once every two years (or twice a year in case of frequent use) to ensure that they are working properly for a long and safe life.
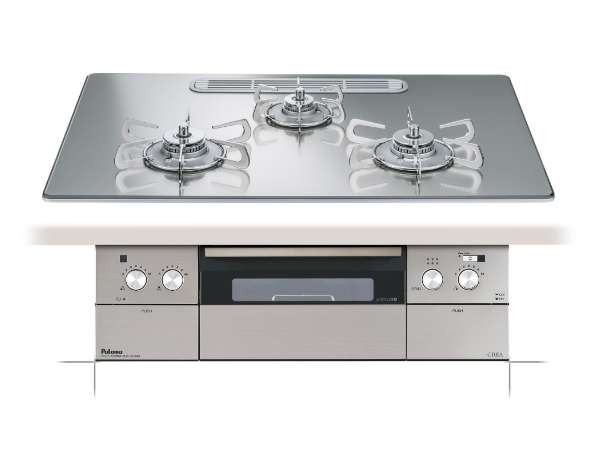
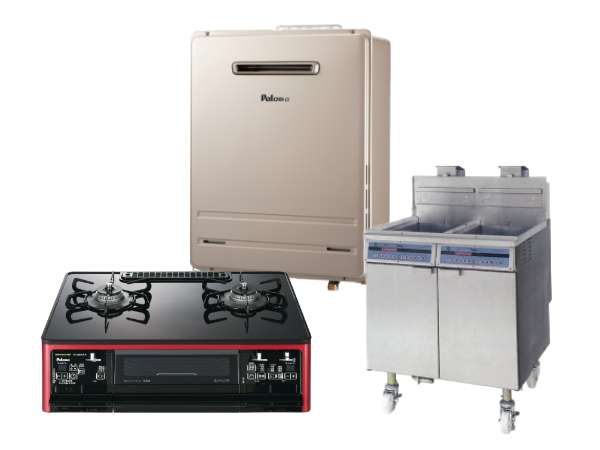
Kitchen
Gas table stove
Installation location and surrounding fire protection measures
Install it correctly as it may cause carbon monoxide poisoning, fire, or burns.
* Please take fire prevention measures in accordance with local fire prevention regulations.
Please choose a place that meets the following conditions.
- The wind doesn't blow
- Horizontal and stable
- No water or heat
- There is no danger of falling objects
- Good ventilation
- There is no water heater on
- There are no resin products such as lighting fixtures on the top
- There are no combustibles around
* Please observe the installation standards even when remodeling the surroundings of the equipment (such as attaching a hanging cupboard) after installation.
When there are flammable materials (combustible walls such as wood, walls with non-combustible materials such as stainless steel plates and thin tiles directly attached to the flammable walls, shelves, etc.)
- The sides and back above the top plate should be at least 15 cm away, and the top should be at least 100 cm away from the top of the top plate.
- If the above separation distance cannot be obtained, install a heat shield.
About heat shield
Attach the separately sold heat shields A, B, and C as shown in the figure.
* The heat shields A and B require a gap of 25 mm between the wall and the top plate, and the mounting method is screwing to the wall.
Fire protection measures on the high heat burner side
Even if the flammable countertop or sink is at the same height or lower than the top plate, protect it as shown in the figure when installing the high-heat burner side in close contact.
Gas connection
When using a rubber tube for gas (soft cord), use one with an inspection pass mark or JIS mark, insert it up to the red line, and secure it with a rubber tube stopper.
- Never add or fork.
- Do not pass above or below the device.
- Do not touch high temperature parts such as other heat sources.
- 折Avoid breaking, twisting and pulling.
- Make sure that the connection port is clean and free of dust.
- Cut to the appropriate length so that the rubber tube does not touch the device.

* If not connected properly, it may cause gas leakage.
* Except for the rubber tube for gas and the gas cord, it lacks durability and may cause gas leakage.
When using a gas cord, connect it correctly according to the instruction manual for the slim plug and gas cord.
Gas built-in equipment
Confirmation of installation location
The location where the equipment is installed has the following restrictions under the Building Standards Act, the Gas Business Act, the Liquefied Petroleum Gas Act, and the fire prevention regulations of each region, so please confirm that it is a suitable location.
According to the Fire Prevention Ordinance, from combustible materials around the equipment (including flammable walls with stainless steel plates and tiles attached), the sides above the top plate of the equipment are 15 cm and 7.5 cm or more (see the figure below), and the rear is Please make it 15 cm or more and 100 cm or more above. [Caution] Even if a stainless steel plate or tile is attached directly to a flammable wall, heat transfer is good, and combustibles may carbonize over many years, resulting in a fire, so be sure to observe it. Although safety has been confirmed by the isolation distance shown in the figure, install it while maintaining a safe distance for fire prevention as instructed by the local fire department.
If the above separation distance cannot be observed, attach the separately sold heat shields A, B, and S as shown in the figure below.
![]()
- Do not install in a place where strong wind blows.
It may not ignite or may be extinguished during combustion. - Do not install it in a place with falling objects such as under a shelf.
A falling object may catch fire and cause a fire. - Install it in a place with sufficient ventilation.
- Do not install it in a place that blocks the exhaust port or intake port of the equipment. It may cause incomplete combustion or abnormal overheating.
- Install it in a horizontal and stable place.
- Do not install the device in a place where it will be exposed to water or in a humid place.
- Do not install in places where inspection and repair are difficult.
- Check the position of the gas pipe. For details, refer to the construction manual attached to the equipment.
- Please check the construction manual attached to the product for the opening size of the worktop.
- If there is no back plate on the back of the cabinet (Figure 1), the inside air and the outside air will be connected at the pipe penetration part such as the gas pipe, and an abnormal air flow will occur, which may result in abnormal combustion or misfire in the middle. Please cover the back of the with a board. (Figure 2)
Inspection after equipment installation
Please check the table below when the installation work is completed.
For details such as gas work, please check the work manual attached to the equipment.
Please also read the installation standards and practical guidelines for gas appliances {published by Japan Gas Appliance Inspection Association}.
After confirming the installation, please inform the customer about the operation method, safe usage, etc. based on the instruction manual.
Please be sure to hand over the instruction manual and construction manual to the customer.
Gas accident prevention
Do not use for a long time in a closed room, open the window or turn on the ventilation fan during use. It causes carbon monoxide poisoning. Also, if you use it in a room where other combustion equipment such as a stove is used for a long time, it may be difficult to ignite or it may not burn normally.
* When using a natural exhaust type water heater and a bath kettle at the same time, open the window etc. without turning the ventilation fan to ventilate. Turning the ventilation fan may cause the exhaust gas from the natural exhaust water heater and bath kettle to flow indoors.